

In the passed Google I/O 2016, the biggest annual developer conference organized by Google, very promising API named Awareness API was announced. Here is the 35 mins recorded session in the event.
Good news ! API has just been publicly released few days ago. After playing around in many possible ways, I must say that Awareness API is very interesting and give you a chance to enable rich feature to your application with just few lines of code. This blog will give you information about this amazing API in details. Here we go !
What is Awareness API?
Here is the definition of Awareness API given by Google
A unified sensing platform enabling applications to be aware of multiple aspects of a users context, while managing battery and memory health.
Sounds confusing? Yup, may be. Anyway, actually this API is pretty easy and straightforward. It was made to bring you a capability to work with data related to user's current context, for example,
- Local time of user's current location
- Weather information of place where user currently is
- User activity: Walking, biking, running, etc.
- Do something when user moves close to the specific coordinate
- Check if headphones are plugged in or not
It is true that some task could be done with currently-available set of API, for example, you could pull weather information of current location by passing user's coordinate to Weather API, and since you can get user's coordinate periodically so you could calculate user's velocity to guess user activity as well.
Although it is possible to do so but I must say that it is not an easy job and an implementation easily causes an error in practical. But with Awareness API you can gain these advantages:
- You can do those amazing things with just few lines of code.
- Data got from this API is more accurate since it is already processed in the proper way.
- No more worries about battery consumption since Awareness API is already optimized. It will manage all of those for you.
In conclusion, Awareness API allows you to get data based on user's context easier, more accurate with better performance.
Context Types
There are 7 kinds of context that we can work with in Awareness API such as
Time - Local time at current user's location
Location - Latitude/Longitude
Place - Places around user
Activity - Detected user activity (biking, walking, running, etc.)
Beacons - Check nearby beacon(s)
Headphones - Are headphones plugged in?
Weather - Current weather conditions
Although these sets of information cover most of the use case in general already but I believe that more will come in the near future.
Two set of APIs in Awareness API
There are two sets of API available in Awareness API such as
Snapshot API - Allows you to "request an information based on user's context" as listed above.
Fence API - Allows you to "receive a signal when user's context has changed and reaches the condition" through callback function, for example, if user moves closed to the specific coordinate with headphones plugged in, Fench API will call the registered BroadcastReceiver and let you do your job.
Actually those two sets of API work with the exact same set of data. Google just seperates it into two to make it easier to communicate. Snapshot to get data, Fence to detect change. That's all.
Get Started
Awareness API is part of Google Play Services 9.2. To use it, you need to set up your project to enable GMS. First of all, a project in Google Developer Console is needed.
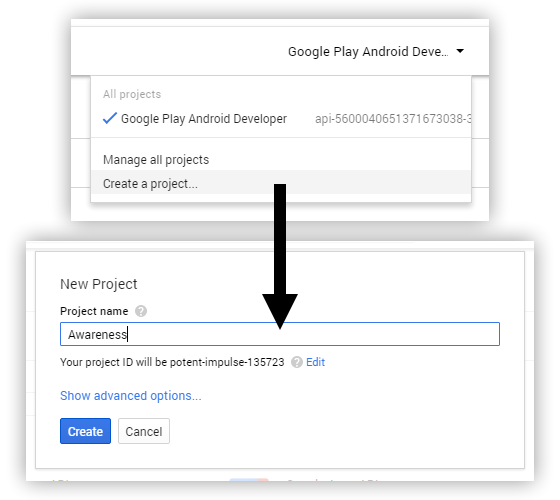
1) Create a project in https://console.developers.google.com (or in case you already have one, you can use it instead)
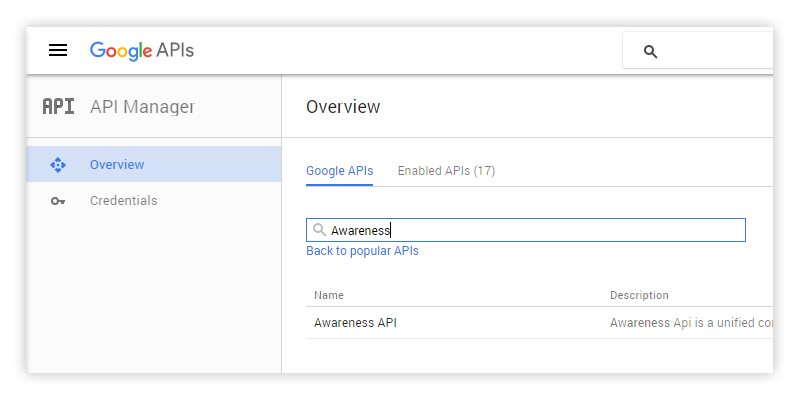
2) And then browse to API Manager page and search for Awareness and click at Awareness API
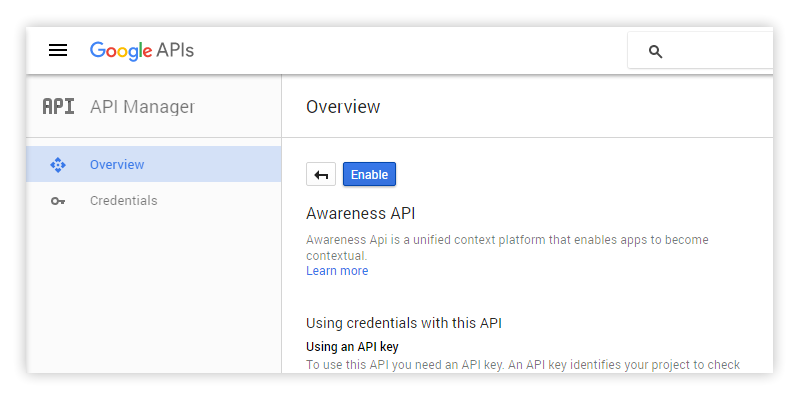
3) Click Enable and wait until it finishes enabling
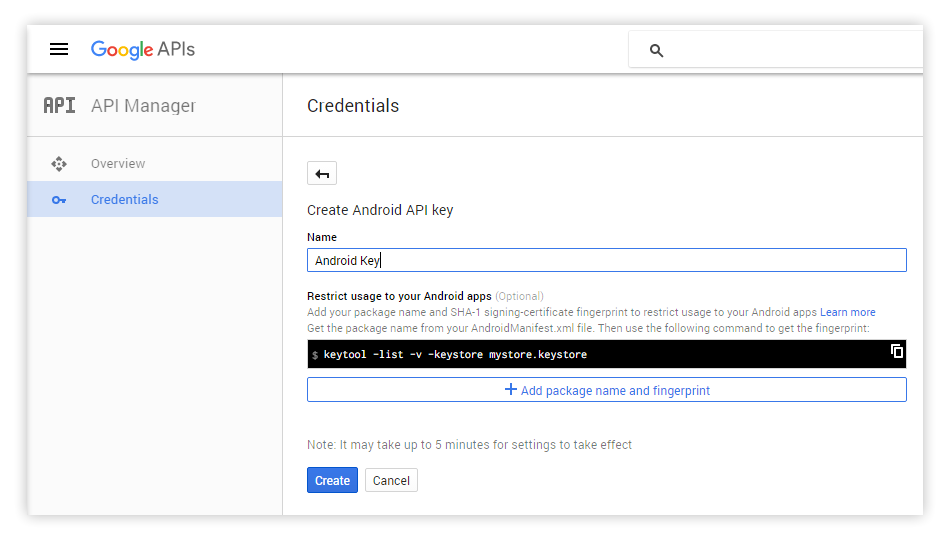
4) Go to Credentials tab and click at Create credentials -> API key -> Android key. Enter the name you project, for example, Android key and click Create (or if you have already created Android key previously, you could skip this step and use the existed one)
5) API key will be generated with format like this: AIzaSyBdVl-cTICSwYKrZ95LoVuw7dbMuDt1KG0. Copy it somewhere. We need it in the further step.
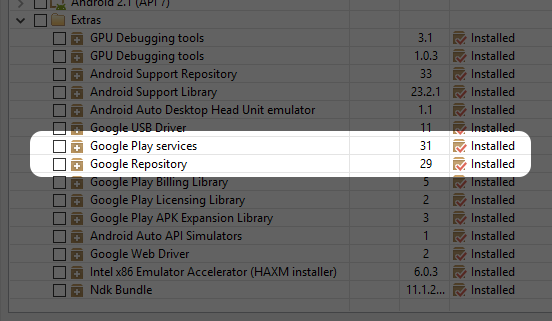
6) Launch Android SDK Manager and update Google Play Services and Google Repository to the latest version.
7) Launch Android Studio, create a new project and then open application module's build.gradle and add dependency for Awareness API like below.
dependencies {
    compile 'com.google.android.gms:play-services-contextmanager:9.2.0'
}
Sync Gradle once done.
7) Open AndroidManifest.xml file and add meta-data to <application> tag like this:
        <meta-data
            android:name="com.google.android.awareness.API_KEY"
            android:value="YOUR_KEY" />
        <meta-data
            android:name="com.google.android.geo.API_KEY"
            android:value="YOUR_KEY" />
        <meta-data
            android:name="com.google.android.nearby.messages.API_KEY"
            android:value="YOUR_KEY" />
Don't forget to replace YOUR_KEY with API key acquired by the step above.
Please note that the first meta-data is mandatory but the rest are optional. The second one (geo) is needed if you want to access Place while the last one (nearby) is needed if you want to work with Beacon. If you have no plan to access those APIs, please feel free to remove the related meta-data anytime.
8) Add 2 permissions in the same AndroidManifest.xml file inside <manifest> tag.
    <uses-permission android:name="android.permission.ACCESS_FINE_LOCATION" />
    <uses-permission android:name="com.google.android.gms.permission.ACTIVITY_RECOGNITION" />
The first one is used to access information related to GPS location (Beacon, Location, Place and Weather) while the latter is used to detect user's activity (Activity). Headphone and Time don't need any extra permission.
9) Open MainActivity.java file and let's initialize GoogleApiClient inside onCreate to enable Awareness API in your application.
public class MainActivity extends AppCompatActivity {

    private GoogleApiClient mGoogleApiClient;

    @Override
    protected void onCreate(Bundle savedInstanceState) {
        super.onCreate(savedInstanceState);
        setContentView(R.layout.activity_main);

        mGoogleApiClient = new GoogleApiClient.Builder(MainActivity.this)
                .addApi(Awareness.API)
                .build();
        mGoogleApiClient.connect();
    }
}
That's all. Your project is now set up and API is now ready to be called. After this I will give you a demo on how to access the data in Awareness API one by one. Please note that to testing device is needed to have Google Play Services 9.2 installed. Please update it to the latest or application may not be able to run on your device.
Snapshot API
Let's start with something easy like "requesting an information", so let's start with Snapshot API. Here is the code structure I use in this demo.
    private static final String TAG = "Awareness";

    @Override
    protected void onCreate(Bundle savedInstanceState) {
        ...

        initSnapshots();
    }

    private void initSnapshots() {

    }
All codes below will be put inside initSnapshots() so it will be called immediately when the Activity is created.
First thing to know here is Snapshot API is accessible through Awareness.SnapshotApi. That's all. Let's go for the first one.
Activity
Detect user's activity. Here is the code snippet.
        Awareness.SnapshotApi.getDetectedActivity(mGoogleApiClient)
                .setResultCallback(new ResultCallback<DetectedActivityResult>() {
                    @Override
                    public void onResult(@NonNull DetectedActivityResult detectedActivityResult) {
                        if (!detectedActivityResult.getStatus().isSuccess()) {
                            Log.e(TAG, "Could not get the current activity.");
                            return;
                        }
                        ActivityRecognitionResult ar = detectedActivityResult.getActivityRecognitionResult();
                        DetectedActivity probableActivity = ar.getMostProbableActivity();
                        Log.i(TAG, probableActivity.toString());
                    }
                });
Code is quite straightforward. You could simply call getDetectedActivity and result will be sent through associated callback. Here is the example result from Log.i line:
I/Awareness: DetectedActivity [type=STILL, confidence=100]You will notice that we are able to detect user's current activity type ("STILL" in this case). You can get this information by calling probableActivity.getType() which will return as an integer listed below.
    public static final int IN_VEHICLE = 0;
    public static final int ON_BICYCLE = 1;
    public static final int ON_FOOT = 2;
    public static final int STILL = 3;
    public static final int UNKNOWN = 4;
    public static final int TILTING = 5;
    public static final int WALKING = 7;
    public static final int RUNNING = 8;
You will also be able to check the confidence of activity type by calling probableActivity.getConfidence() which will return an integer with value between 0-100.
Easy, huh? Another API in Snapshot API will also be called in the same way like this one.
Headphones
Check headphones plugged in state. Here is the code snippet.
        Awareness.SnapshotApi.getHeadphoneState(mGoogleApiClient)
                .setResultCallback(new ResultCallback<HeadphoneStateResult>() {
                    @Override
                    public void onResult(@NonNull HeadphoneStateResult headphoneStateResult) {
                        if (!headphoneStateResult.getStatus().isSuccess()) {
                            Log.e(TAG, "Could not get headphone state.");
                            return;
                        }
                        HeadphoneState headphoneState = headphoneStateResult.getHeadphoneState();
                        if (headphoneState.getState() == HeadphoneState.PLUGGED_IN) {
                            Log.i(TAG, "Headphones are plugged in.\n");
                        } else {
                            Log.i(TAG, "Headphones are NOT plugged in.\n");
                        }
                    }
                });
You will see that it is exactly the same way like we did to acquire user's activity. To get headphone's state, you could simply call headphoneState.getState() which will return two possible results: HeadphoneState.PLUGGED_IN or HeadphoneState.UNPLUGGED.
Location
Get device's lat/long coordinate.
            Awareness.SnapshotApi.getLocation(mGoogleApiClient)
                    .setResultCallback(new ResultCallback<LocationResult>() {
                        @Override
                        public void onResult(@NonNull LocationResult locationResult) {
                            if (!locationResult.getStatus().isSuccess()) {
                                Log.e(TAG, "Could not get location.");
                                return;
                            }
                            Location location = locationResult.getLocation();
                            Log.i(TAG, "Lat: " + location.getLatitude() + ", Lon: " + location.getLongitude());
                        }
                    });
To get latitude and longitude, just simply call location.getLatitude() and location.getLongitude() respectively. There are also some another value that you can get, for example, altitude. You could read the related document, Location class, for more information.
* To make code above works on Android M and higher, you need to implement Runtime Permission to let user grants access to ACCESS_FINE_LOCATION permission or SecurityException will be raised. This part of code will look like this.
        if (ContextCompat.checkSelfPermission(
                MainActivity.this,
                android.Manifest.permission.ACCESS_FINE_LOCATION) !=
                PackageManager.PERMISSION_GRANTED) {
            ActivityCompat.requestPermissions(
                    MainActivity.this,
                    new String[]{android.Manifest.permission.ACCESS_FINE_LOCATION},
                    12345
            );
        }
I will not write about Runtime Permission in details here. If you want to learn more about this, you could read my previous blog, Everything every Android Developer must know about new Android's Runtime Permission
Places
This function will return you places around user's location. To make this works, you need to enable Google Places for Android in Google Developer Console first. Code snippet below will list you 5 top possible places.
            Awareness.SnapshotApi.getPlaces(mGoogleApiClient)
                    .setResultCallback(new ResultCallback<PlacesResult>() {
                        @Override
                        public void onResult(@NonNull PlacesResult placesResult) {
                            if (!placesResult.getStatus().isSuccess()) {
                                Log.e(TAG, "Could not get places.");
                                return;
                            }
                            List<PlaceLikelihood> placeLikelihoodList = placesResult.getPlaceLikelihoods();
                            // Show the top 5 possible location results.
                            if (placeLikelihoodList != null) {
                                for (int i = 0; i < 5 && i < placeLikelihoodList.size(); i++) {
                                    PlaceLikelihood p = placeLikelihoodList.get(i);
                                    Log.i(TAG, p.getPlace().getName().toString() + ", likelihood: " + p.getLikelihood());
                                }
                            } else {
                                Log.e(TAG, "Place is null.");
                            }
                        }
                    });
Place details could be acquired from p.getPlace() which contains many useful information like getAddress(), getPhoneNumber() or getPlaceTypes(). You could find more about these functions at related document, Place.
* Runtime Permission is also needed to implement to make Places works on Android M and higher.
Weather
Code snippet below allows you to get the weather conditions.
            Awareness.SnapshotApi.getWeather(mGoogleApiClient)
                    .setResultCallback(new ResultCallback<WeatherResult>() {
                        @Override
                        public void onResult(@NonNull WeatherResult weatherResult) {
                            if (!weatherResult.getStatus().isSuccess()) {
                                Log.e(TAG, "Could not get weather.");
                                return;
                            }
                            Weather weather = weatherResult.getWeather();
                            Log.i(TAG, "Weather: " + weather);
                        }
                    });
There are so many useful information you can retrieve, for example,
getTemperature() - Current temperature at the device's current location.
getFeelsLikeTemperature() - What temperature a person would feel is at the device's current location.
getHumidity() - Humidity level at the device's current location
getDewPoint() - Dew point at the device's current location
getConditions() - Current weather conditions as an array of values that best describe the current conditions (something like Clear, Cloudy, Foggy, etc.)
You can find more about these functions at related document, Weather.
* Runtime Permission is also needed to implement to make Weather works on Android M and higher.
Beacon
Detect the state of nearby beacon devices. To make Beacon works, you need to enable Nearby Messages API in Google Developer Console first. Please make sure that your beacon has already been registerd to your Google API project and attachment is already added to that beacon. In case you don't know how to do so, Beacon Tools app developed by Google is being quite a useful tools.
After things have already set up. Declare all the possible attachment's namespaces and types in the code below.
            List BEACON_TYPE_FILTERS = Arrays.asList(
                    BeaconState.TypeFilter.with(
                            "my.beacon.namespace",
                            "my-attachment-type"),
                    BeaconState.TypeFilter.with(
                            "my.other.namespace",
                            "my-attachment-type"));
If your beacon's attachment namespaceType is my-sample-project/mydata , my.beacon.namespace would be my-sample-project while my-attachment-type would be mydata.
To get the beacon state, call getBeaconState
            Awareness.SnapshotApi.getBeaconState(mGoogleApiClient, BEACON_TYPE_FILTERS)
                    .setResultCallback(new ResultCallback<BeaconStateResult>() {
                        @Override
                        public void onResult(@NonNull BeaconStateResult beaconStateResult) {
                            if (!beaconStateResult.getStatus().isSuccess()) {
                                Log.e(TAG, "Could not get beacon state.");
                                return;
                            }
                            BeaconState beaconState = beaconStateResult.getBeaconState();
                            // Get info from the BeaconState.
                        }
                    });
The state result of each beacon device could be retrieved through beaconState.getBeaconInfo(). You could find more information about the result at related document, BeaconState.BeaconInfo.
* Runtime Permission is also needed to implement to make Beacon works on Android M and higher.
Time
There is no Time function available in Snapshot API since you could simply get the local time with Android's standard API.
That's all about Snapshot API. You can see that although it is straightforward and pretty easy to use but it is still very useful. Please give it a try.
Fence API
"Fence" here comes from the well-known word "Geo-fencing" which means the virtual barrier of real-world geographic area. But for Fence, you could do a lot more besides location detection. You could set the condition related to working context in Awareness API and get the callback when condition is reached.
Let's see what it could do by real code. First of all, let's set the code structure. Basically Fence will collect a PendingIntent and whenever the condition is reached, Intent contained inside would be fired. So in this example, I will create a BroadcastReceiver to handle that Intent. Here is the code.
public class MainActivity extends AppCompatActivity {

    private static final String FENCE_RECEIVER_ACTION = "FENCE_RECEIVE";

    private HeadphoneFenceBroadcastReceiver fenceReceiver;
    private PendingIntent mFencePendingIntent;


    @Override
    protected void onCreate(Bundle savedInstanceState) {
        ...

        fenceReceiver = new HeadphoneFenceBroadcastReceiver();
        Intent intent = new Intent(FENCE_RECEIVER_ACTION);
        mFencePendingIntent = PendingIntent.getBroadcast(MainActivity.this,
                10001,
                intent,
                0);
    }

    private void registerFences() {
        // Create a fence.
    }

    private void unregisterFence() {
    }

    @Override
    protected void onStart() {
        super.onStart();
        registerFences();
        registerReceiver(fenceReceiver, new IntentFilter(FENCE_RECEIVER_ACTION));
    }

    @Override
    protected void onStop() {
        super.onStop();
        unregisterFences();
        unregisterReceiver(fenceReceiver);
    }

    class HeadphoneFenceBroadcastReceiver extends BroadcastReceiver {

        @Override
        public void onReceive(Context context, Intent intent) {

        }

    }
Code that does the Fence registration will be placed inside registerFences() while the unregistration one will be placed inside unregisterFences().
Detect Headphones Plugged-In State Change
The easiest example to demo Fence API would be to detect the change of Headphones plugged-in state. To do so, declare the condition as an AwarenessFence variable which in this case, HeadphoneFence will be used to create the Fence condition. Put code below inside registerFences().
AwarenessFence headphoneFence = HeadphoneFence.during(HeadphoneState.PLUGGED_IN);And then call Awareness.FenceApi.updateFences(...) to register the Fence.
        Awareness.FenceApi.updateFences(
                mGoogleApiClient,
                new FenceUpdateRequest.Builder()
                        .addFence("headphoneFenceKey", headphoneFence, mFencePendingIntent)
                        .build())
                .setResultCallback(new ResultCallback<Status>() {
                    @Override
                    public void onResult(@NonNull Status status) {
                        if (status.isSuccess()) {
                            Log.i(TAG, "Fence was successfully registered.");
                        } else {
                            Log.e(TAG, "Fence could not be registered: " + status);
                        }
                    }
                });
The important line is the .addFence() one which asks for the Fence and associated PendingIntent which are headphoneFence and mFencePendingIntent respectively in this example. Whenever condition defined in headphoneFence is reached, an Intent inside mFencePendingIntent would be fired and the registered BroadcastReceiver like fenceReceiver would receive the Intent.
To prevent the memory leak, unregistration is also needed. Put code below inside unregisterFences() to do the job.
    private void unregisterFences() {
        Awareness.FenceApi.updateFences(
                mGoogleApiClient,
                new FenceUpdateRequest.Builder()
                        .removeFence("headphoneFenceKey")
                        .build()).setResultCallback(new ResultCallbacks<Status>() {
            @Override
            public void onSuccess(@NonNull Status status) {
                Log.i(TAG, "Fence " + "headphoneFenceKey" + " successfully removed.");
            }

            @Override
            public void onFailure(@NonNull Status status) {
                Log.i(TAG, "Fence " + "headphoneFenceKey" + " could NOT be removed.");
            }
        });
    }
Now let's handle the Intent in HeadphoneFenceBroadcastReceiver. Modify onReceive function as code below.
    class HeadphoneFenceBroadcastReceiver extends BroadcastReceiver {

        @Override
        public void onReceive(Context context, Intent intent) {
            FenceState fenceState = FenceState.extract(intent);

            Log.d(TAG, "Fence Receiver Received");

            if (TextUtils.equals(fenceState.getFenceKey(), "headphoneFenceKey")) {
                switch (fenceState.getCurrentState()) {
                    case FenceState.TRUE:
                        Log.i(TAG, "Fence > Headphones are plugged in.");
                        break;
                    case FenceState.FALSE:
                        Log.i(TAG, "Fence > Headphones are NOT plugged in.");
                        break;
                    case FenceState.UNKNOWN:
                        Log.i(TAG, "Fence > The headphone fence is in an unknown state.");
                        break;
                }
            }
        }

    }
It is pretty straightforward. Once Intent is received, you could extract the FenceState with FenceState.extract(intent) function.
FenceState fenceState = FenceState.extract(intent);And since a single BroadcastReceiver may be set to receive more than one type of Fence, FenceKey is needed to be checked to do anything next.
if (TextUtils.equals(fenceState.getFenceKey(), "headphoneFenceKey")) {Please note that FenceKey here is the key that we give it in addFence function above. Don't forget to use constant instead of hardcoding in your production code.
The final step is to check the FenceState if the condition is TRUE of FALSE from fenceState.getFenceState() function and then do whatever you want. It's all done !
Test
Code above should now works properly. Please run your application and plug your headphones in. Logcat should show something like this:
D/Awareness: Fence Receiver Received
I/Awareness: Fence > Headphones are plugged in.
And logs below should be shown when you unplug your headphones.
D/Awareness: Fence Receiver Received
I/Awareness: Fence > Headphones are NOT plugged in.
As I said before. It is easy but outcome is very awesome !
All Possible Fences
5 contexts in Awareness API could be set as a condition by using class listed below:
DetectedActivityFence - Detect condition based on user's activity.
HeadphoneFence - Detect condition based on headphones plugging in state.
TimeFence - Detect condition based on local time at user's location.
LocationFence - Detect condition based on user's location.
BeaconFence - Detect condition based on nearby Beacons' state.
Each Fence has its own way to define the condition. I could not put them all here since there are too many. You could find more information by clicking at the class name. Anyway it supposes not to be a problem since if you understand the concept of HeadphoneFence code above, you would be able to apply and learn how to use another Fence by your own.
Please note that Weather and Places are not available in the Fence API.
Detect Multiple Fences Condition
In many cases it is useful to combine multiple conditions as a single Fence with and/or logic, for example,
- If user is running and has headphone plugged in.
- If user move closed to the specific location in the afternoon.
Don't worry. Fence API would do you a job. You could do it in the fancy way by declaring all the AwarenessFences, for example,
        AwarenessFence headphoneFence = HeadphoneFence.during(HeadphoneState.PLUGGED_IN);
        AwarenessFence detectedActivityFence = DetectedActivityFence.during(DetectedActivityFence.RUNNING);
And combine them with AwarenessFence.and like this:
AwarenessFence andFence = AwarenessFence.and(headphoneFence, detectedActivityFence);And then pass andFence to addFence(...) command and everything would works like desired.
Besides and, or and not are also be able to be done with AwarenessFence.or and AwarenessFence.not respectively. Please feel free to apply the logic as you want.
Use Case
There are some application that utilize the benifit of Awareness API. Here are two examples.
Superplayer Music - It could suggests you a song based on weather at user's location. Imagine, sad song in the rainy season ... That's cruel !
Trulia - Real estate application that could notify user when user is walking near the listed house and the weather is nice.
As you can see from the use cases above. With Awareness API, you could implement quite a lot of amazing rich features like you have never thought it is possible before. Only barrier now is your imagination ! Working with user's context is really awesome and can cause your application get the higher retention and positive feedback.
Conclusion
That's all about Awareness API in details. I found that it is very useful and I must say that I am very impressed with its capability. Anyway please note that Awareness API is a part of Google Play Services so it will work on device with GMS installed only. Always be reminded that your application might not be able to run on those Chinese devices out there.
I hope that you find this blog post useful. Have fun playing with user's context ! =D
 |
Author: nuuneoi (Android GDE, CTO & CEO at The Cheese Factory) A full-stack developer with more than 6 years experience on Android Application Development and more than 12 years in Mobile Application Development industry. Also has skill in Infrastucture, Service Side, Design, UI&UX, Hardware, Optimization, Cooking, Photographing, Blogging, Training, Public Speaking and do love to share things to people in the world!
|